
The Complete Guide to Installation, Care and Long-Term Durability
Whether you’re promoting an event, advertising your business or displaying information outdoors, a well-installed banner can attract attention for months. However, even the highest-quality PVC banner won’t perform as expected if it isn’t fitted correctly.
Incorrect installation can lead to sagging, ripped eyelets, torn material and unnecessary replacement costs—especially during windy weather.
This guide explains the most effective ways to secure an outdoor banner, how to extend its lifespan, and which fixing method is best for different locations.
Why Proper Banner Installation Matters
Outdoor banners are designed to withstand the British weather, but they still need to be installed correctly.
A securely fixed banner offers several advantages:
- Better appearance with a smooth, professional finish
- Less movement in windy conditions
- Reduced stress around eyelets
- Longer product lifespan
- Improved safety for pedestrians and nearby property
Taking a few extra minutes during installation can add years to the life of your banner.
Choosing the Right Fixing Method
There isn’t a single “best” way to install every banner.
The correct method depends on:
- Where the banner is being displayed
- The surface you’re fixing to
- How long it will remain installed
- Expected weather conditions
- Banner size
Below are the five most popular methods used by professionals.
1. Cable Ties (Zip Ties)
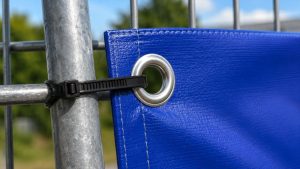
Cable ties are one of the quickest and most affordable methods of securing PVC banners.
They work particularly well on:
- Heras fencing
- Temporary fencing
- Railings
- Construction sites
- Event barriers
- Advantages
- Extremely inexpensive
- Fast installation
- Widely available
- Weather resistant
- Suitable for temporary displays
Thread each cable tie through the banner eyelet and around the supporting structure before tightening.
Installation
Do not overtighten.
The banner should remain secure while still allowing a small amount of natural movement.
Excessive tension places unnecessary stress on the eyelets and can shorten the life of the banner. This aligns with the guidance shown in the installation leaflet.
Professional Tip
Always use every eyelet supplied.
Many banner failures occur because only the four corners are secured.
2. Bungee Cords
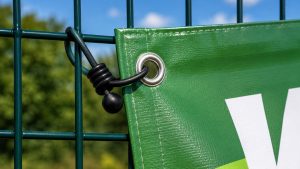
For outdoor installations exposed to wind, bungee cords are often the preferred solution.
Unlike cable ties, they allow controlled movement while absorbing wind pressure.
Ideal locations include:
- Sports grounds
- Outdoor events
- Temporary advertising
- Mesh fencing
- Construction hoardings
Benefits
- Reduces stress on eyelets
- Helps prevent tearing
- Easy to adjust
- Reusable
The flyer recommends adjustable bungee cords so the tension can be fine-tuned as required.
Best Practice
Leave a small amount of elasticity.
A banner that can flex slightly during strong winds will generally last much longer than one stretched completely tight.
3. Nylon Rope
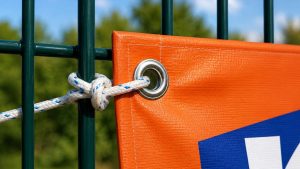
Nylon rope provides a reliable solution when fixing banners to fences, railings or other structures where cable ties or bungees aren’t practical.
It’s particularly useful for:
- Wooden fencing
- Metal railings
- Large outdoor displays
- Agricultural sites
Installation Tips
Pass the rope through every eyelet where possible.
Use secure knots and distribute the tension evenly around the banner.
For exposed areas, a thicker rope offers additional strength and durability.
4. Screws and Washers
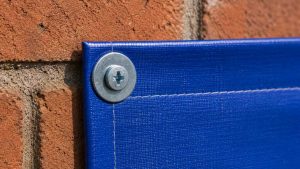
When installing onto brick, timber or concrete, screws and washers create a secure long-term fixing.
Common applications include:
- Shopfronts
- Building walls
- Warehouses
- Permanent advertising boards
Why Use Washers?
A washer spreads the pressure over a larger area instead of concentrating it directly on the eyelet.
This greatly reduces the chance of tearing.
Installation Advice
- Drill pilot holes first.
- Use suitable wall plugs where required.
- Position washers over the eyelets.
- Tighten until secure without crushing the material.
The original guide also recommends choosing a suitable permanent location before installation.
5. Banner Clips
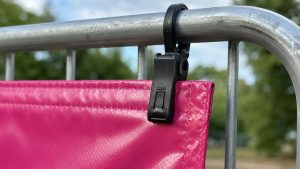
Banner clips are ideal when eyelets cannot be used or additional fixing points are required.
They clamp directly onto the banner material.
Typical uses include:
- Oversized banners
- Extra wind support
- Temporary exhibitions
- Indoor displays
Advantages
- No additional eyelets required
- Easy to reposition
- Excellent for reinforcing large banners
The leaflet advises spacing banner clips evenly to prevent sagging and uneven tension.
Which Fixing Method Should You Choose?
| Installation Location | Recommended Fixing |
|---|---|
| Heras fencing | Cable ties or bungee cords |
| Metal railings | Cable ties or nylon rope |
| Brick walls | Screws and washers |
| Wooden fences | Screws or rope |
| Temporary events | Bungee cords |
| Permanent signage | Screws and washers |
Preventing Banner Damage
A banner doesn’t usually fail because of poor print quality—it fails because of poor installation.
To maximise its lifespan:
- Secure every eyelet.
- Check fixings regularly.
- Replace worn cable ties.
- Avoid leaving banners exposed during severe storms if possible.
- Prevent excessive flapping in strong winds.
The maintenance section of the leaflet also advises avoiding prolonged exposure to severe weather and handling banners carefully to reduce wear.
How to Clean an Outdoor Banner
Outdoor banners naturally collect dirt, road dust and pollution.
Fortunately, they’re very easy to clean.
Recommended Method
- Use lukewarm water.
- Wipe with a soft cloth or sponge.
- Use mild soap for stubborn marks.
- Rinse with clean water.
- Allow the banner to dry naturally.
Avoid:
- Pressure washers
- Bleach
- Solvents
- Abrasive cleaning pads
- Harsh chemicals
These recommendations are consistent with the cleaning instructions.
Storing Your Banner
If your banner will be reused:
- Roll rather than fold it.
- Store in a cool, dry place.
- Ensure it is completely dry before storage.
- Keep it away from direct sunlight when not in use.
Rolling the banner helps prevent permanent creases, while dry storage reduces the risk of moisture damage.
How Long Does an Outdoor Banner Last?
The lifespan depends on:
- Weather exposure
- Installation quality
- Material
- Wind conditions
- Maintenance
With proper care, a quality PVC banner can typically last 2–5 years, although continuous exposure to harsh weather may reduce its service life.
Final Thoughts
A professionally printed banner deserves a professional installation. Choosing the right fixing method, checking your banner regularly and following simple maintenance practices will help keep it looking smart while extending its usable life.
Whether you’re advertising a local event, promoting a business or displaying information on a construction site, a little care goes a long way.
At Banner Printed, we manufacture high-quality PVC banners in a wide range of sizes, complete with reinforced hems and eyelets, making installation quick, secure and reliable.